Posts

Git Squash: Keep Clean of Your Git Commit History

Image
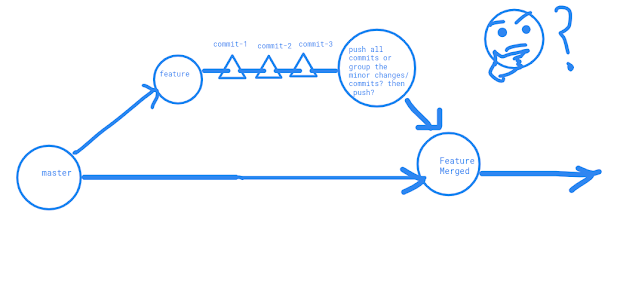
  I magine, you are assigned to write a new feature of the main product. How do you start? You copy the source code, start coding for feature, write, test, write, fix bugs selfly explored, optimize code, fix typos or such minor task,s and time to time you have to commit your changes so that you don’t lose the valuable work you have done for the feature. So, we can guess, you may have commits of test code, some type fixing commit, commit of missing comments etc. At last, you have completed your feature! Wow! Gre a t work! But wait! You want to have a look at your commit history and applied: git log - -oneline Facepalm situation! You got all your commits including minor changes, typos, bug fixing, code-comment all types of commits in separate commits! How the hell shall I clean my messy commit history? Feels awkward, right? No worries buddy! Git has given us the power to present them nicely, combined them into a single commit. This way, you can group your commits so that you don’t have

Spring Boot Scheduler for Distributed System: Using shedlock

Image
  When we want to execute something on a routine/scheduled basis, we need something which can automatically do such an operation if our app is running on the server. To achieve that, we can follow one of many ways. But I prefer Spring scheduler to do my scheduled job for its user-friendly use cases.   So, for spring boot, it is very easy to set up a scheduler method. Let's configure. Please note that, in this writing, I will only mention the vital portion/code snippet for brevity. You will find the whole code linked to GitHub end of this writing. So, what we need for this? So far we don't need anything rather than basic libraries for spring boot app development. Let's configure a Scheduler class: Schedular.java: @Component @Log4j2 @EnableScheduling public class Schedular { @Scheduled(initialDelayString = "${initial.delay}", fixedDelayString = "${fixed.delay}") public void scheduledJob() { log.info("*** my schedular

Re-Indexing Elasticsearch index with Existing Data

Image
  Recently, I was required to modify my existing elasticsearch index’s field mapping. But the problem is, there is no way to make a change in your existing field-mapping without creating a new index. But if I delete the existing index, all my data will be gone! So, what to do now??? Here comes a great solution! Recently elasticsearch has introduced a new API, RE_INDEX. Let’s see how can we use this to achieve our goal! Before that, I am gonna quote from the elasticsearch API: Reindex does not attempt to set up the destination index. It does not copy the settings of the source index. You should set up the destination index prior to running a _reindex action, including setting up mappings, shard counts, replicas, etc. So, let’s create a backup index : PUT project_copy { "settings" : { "index" : { "number_of_shards" : 5, "number_of_replicas" : 2 } } } Response: { "acknowledged" : true, &

Java with MINIO file operations: upload, download, delete

Image
If you have started working with MIN IO called as MINIO  I guess you have heard enough about this. This is nothing but object storage service. Quoting from them MinIO is a High Performance Object Storage released under Apache License v2.0. It is API compatible with Amazon S3 cloud storage service. Use MinIO to build high performance infrastructure for machine learning, analytics and application data workloads. Today, we will see how to connect with minio, store documents as minio-object and get them from minio server with spring(java). Here, I should mention that their documentation is very good and you can achieve all these from them. But if you need live example code then you can follow here. First of all, you need minio server running in your machine. If you are struggling with that check  MinIO Quickstart Guide , pretty much straight forward. If it runs successfully, you will see a screen like this: Check, you have got default accessKey and secretKey for starter.

Elasticsearch Deep Pagination : Search_After

Those who use elasticsearch for their data storage or data search purposes, sometimes need pagination. Like when we search in google, we see the first page on first result, then below the search result, we can see other search results in different pages which are mentioned below with page number in google's search result page. We can navigate to and from clicking on the pageNumber we are shown. For elasticsearch who has ever implemented pagination in traditional way providing from and size parameters, knows that elasticsearch does not allow more than 10k records for a query.  Those who are interested to have a short brief about different type of ES pagination, can check this  Elasticsearch, how we paginated over 10 000 items .  I am not going to describe full of it rather  a short brief here as the topic suggests. Elastic search provides a mechanism of pagination for more than 10k records and one of them is by search_after method which is much better for some context than t

Kafka connect to Elastic Search: Sink kafka Stream data to Elastic search

We have learned how to outsource stream data from MySQL change log to Kafka topic via kafka-source connector from  Kafka Stream API: MySQL CDC to apache Kafka with debezium  . Now we will learn how to ingest this data to Elastic search and create index on those documents. So, our target is:  Change in MySQL db table record , outsource the record in Kafka topic related to that table, ingest and create index on Elastic search I am assuming you are already having below mentioned services up and configured from the previous blog mentioned above with their compatible version: zookeeper ---> Running Kafka Broker --> Running Kafka Connect --> Running(We will rerun the same way we did in past but with extra config file, will see below) Requirements: Elastic Search : v_7.0.1 Kibana : v_7_0_1  Kafka-Elastic connector jar:  kafka-connect-elasticsearch-5.4.0.jar [donwload updated confluent platform , v5.4.0 , and go to confluent folder-> share-> confluent-hub-